Where To Host Your Images... For Free
First of all, know that as far as I can tell there's no reason to BUY image storage. If you run out some where, you can always use Imgur, since it is UNLIMITED.
That doesn't narrow it down much though... I mean, there's a lot of free hosts out there. One must choose wisely.
I'll be showing you my three favorites, PhotoBucket, Imagur, and tinypic. Both are very user friendly, are free, and versatile. If you need lots of space, I highly reccomend Imgur, (it's the second review down on this page). If you need no account, scroll to the last one, tinypic. PhotoBucket... I'm not sure why you'd choose that one but you might, so... you know. :D
I don't at all recommend flickr or imagr. Both are just un-user-friendly and weird.
Click the text of the review to visit the site (it's blue if it's linked).
Okay, to start...

In short:
For the long version (because I always have a long version)
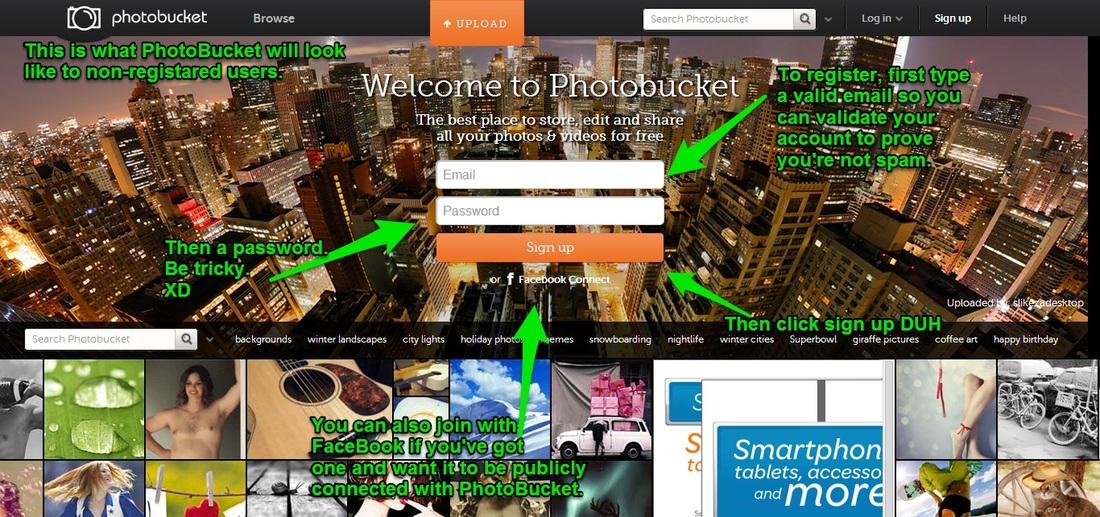
- Go to photobucket.com
- There'll be a place to sign up in the middle of the page
- Fill it in
- Click sign up
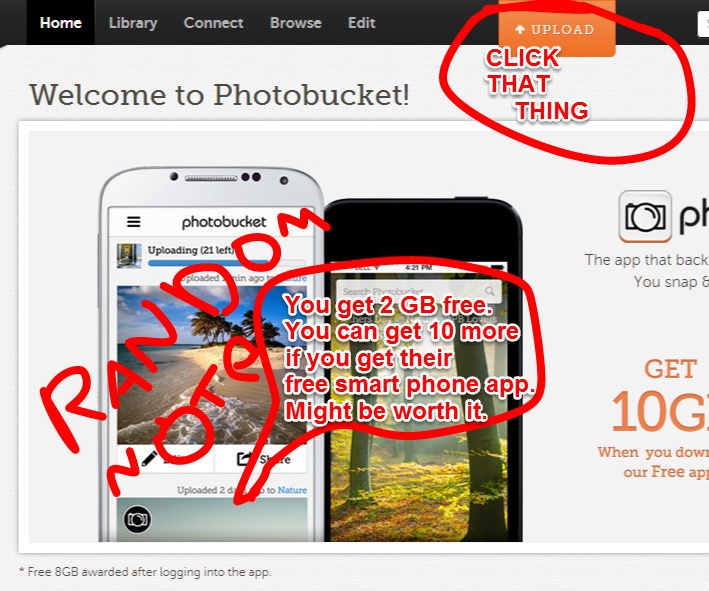
- Once you're done signing up the rest of the way they'll offer you 10 more GB of storage for free wit their app... you don't have to say yes or no
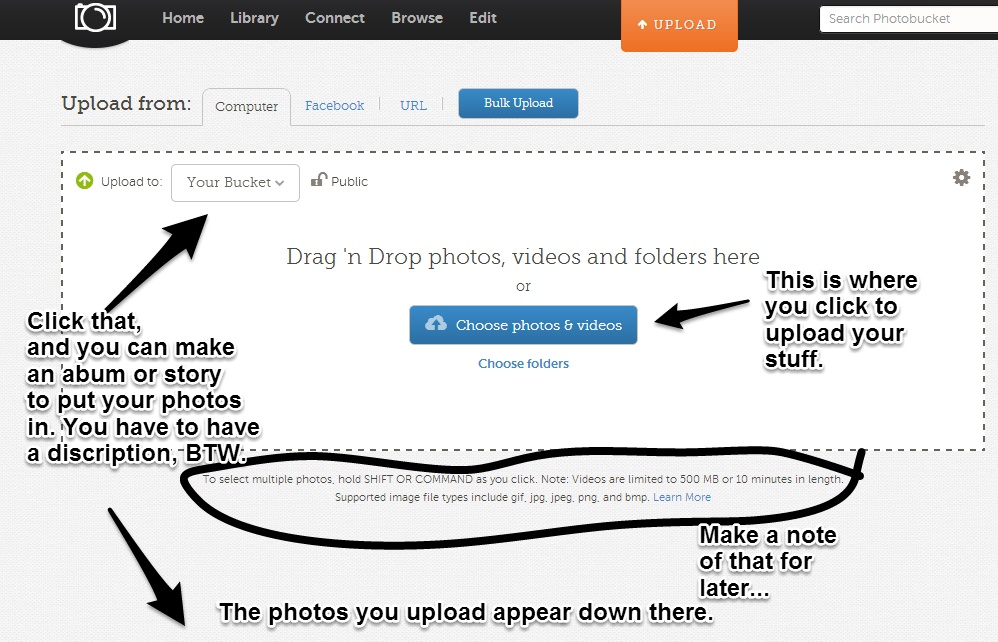
- Click the orange button on the top middle that say "^ Upload" on it
- Click the "choose photos and videos" button, or drag and drop your images in (you can also drag on a whole folder of images at once)
- The images will start to upload automatically
- You can see all the images you've uploaded at once down below if you scroll down the page. You can add titles to them here as well.
- You can click on any image to go to its page and get the IMG code you need to post it in forums, the HTML for sites, URL for email, etc etc
- When uploading, you can click the dropdown arrow next to the word "your bucket" above the "browse" button and select an album to add the photos to
- You can also click "create new album" and make one to add them to
- You can also click the "library" button on the top nav bar anytime to view all your images and albums.
- And that's it!
For the long version (because I always have a long version)
First of all, head to photobucket (click the text above and it will open in a new window).
Then follow the directions on the screenshot...
Then follow the directions on the screenshot...
Then you'll have to fill in a couple of other things like your birth date and the like (I am sure you can handle that yourself). Then you're registered!
Now, the actual uploading part.
Follow the text on the images!
Now, the actual uploading part.
Follow the text on the images!
When making an album or story:
An album is just that... an album, you name it and add photos to it and can scroll through the photos in an album all together.
A story is, well, using photos and captions in the right order to create a story, like an online story board.
Stories are made from albums so you have to have all your photos in an album and then go somewhere else to make the story.
But for albums:
Now do you get the codes you ask?
An album is just that... an album, you name it and add photos to it and can scroll through the photos in an album all together.
A story is, well, using photos and captions in the right order to create a story, like an online story board.
Stories are made from albums so you have to have all your photos in an album and then go somewhere else to make the story.
But for albums:
- Click the drop down on the word "your bucket"
- click "new album"
- Name it
- Add a description
- Set the privacy (public, private, password protected)
- You can make a sub album by adding the album to an album
- Click create and the photos you upload will go in there.
- By selecting that drop down you can also select an album you have already
Now do you get the codes you ask?
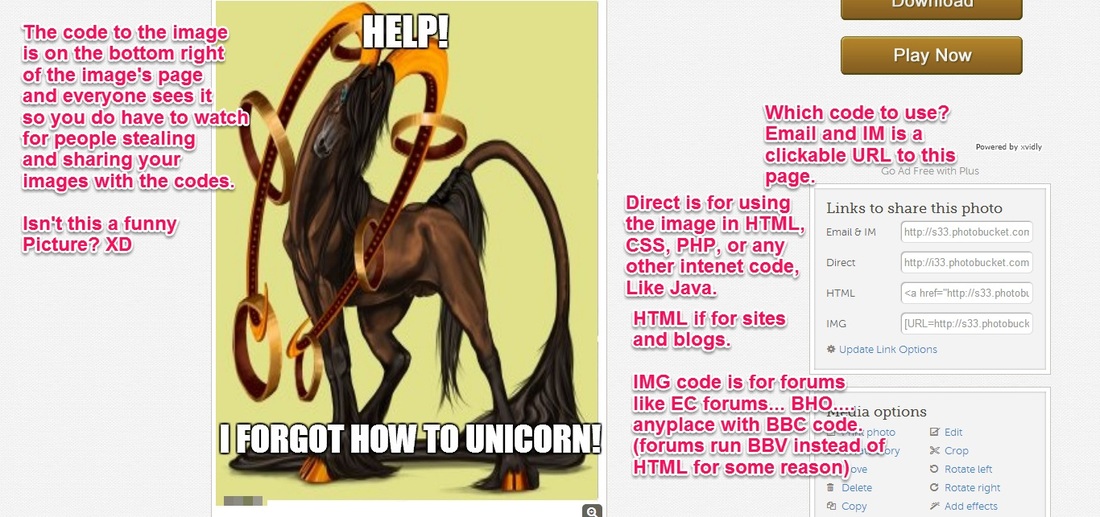
You can view all your images from your library anytime (it's on top of the nav bar). People can comment on your photos and you can add titles and descriptions.
Imagur

imgur is a very simple option. It doesn't have as much complication as PhotoBucket, and it doesn't exactly say how much space it has, but if I recall it's more than the small 2 GB of PhotoBucket.
One downside to imgur is it's web designer: whoever got hired to design the color scheme for the site shose black, gray, and green, which makes one feel as though one is looking at a terminal computer from the early 90s. But regardless, it's very simple and offers albums for your photos so I'll give you a little review.
One really cool thing that Imgur lets you upload and image that is not on your computer. I'll show you later, but that's a cool feature- you don't have to save every image you want to share to your computer this way.
Anyway, as usual, a short and long version of the tutorial is on the way!
In Short
- Go to imgur.com
- Click the sign up button in the top right corner (way up in the corner, and it's gray or black, hard to tell)
- Fill in what they ask and click the submit/sign up/whatever button
- You'll be taken to a page where it shows you that you have 0 images uploaded (go figure)
- On the left of the Imgur page, there's a little box that always is there no matter what page you're on, and it has two buttons: Computer and Web
- You can click the drop down arrow next to the words "add to album" and then choose an album to upload to ot make a new one
- When you make a new album it will give you three choices for how you want them displayed (a list, a slideshow etc) if you're just hosting it doesn't matter
- For now let's upload an image from our computer: click Computer (or open your pictures and drag and drop pictures/folders anywhere on the page)
- It'll start uploading them to the album you selected. If you didn't select one then to see the pictures, click the word "images" in the top right of the screen
- You can click the word "albums" in the top right as well to view all your albums. Click an album to view the photos in it.
- Either way if you want to get the code for an image, click on it, and it'll take you to the image's page. On the left are a list of codes for you to copy and paste
- Imgur offers lots of different codes, more than any other, so you have lots of options
- Link is for Email or IM and takes people to the page that you're viewing right now and copying the code from
- Direct link is for HTML codes, CSS, Java, etc, any kind of code you're writing. You can use it in place of the Link as well, I think.
- HTML code is for embeding the image on your blog or website
- BBCode is what message boards, discussion forums, and the like, and puts the image right in your post
- Linked BBCode puts a link to your image in a forum or discussion board (as the other link will just how up as text on a forum running BBC)
- Markdown Link is what you use on the social media network, reddit. Us graphics people aren't redditing our work so you can ignore that.
- You can add a title or description to your photos by clicking the dropdown link under the image om the same page as the codes are on
- And that's it, you're done! If you get stuck click here to visit imgur's FAQ page, it's very helpful! (it opens in a new window).

tinypic doesn't require an account, and in fact doesn't even give one the option, and also doesn't appear to have a storage limit, although after five years or so it gets deleted eventually.
tinypic is very easy to use, but you can't have albums or go back later to get things, rather you must upload them again.
tinypic is very easy to use, but you can't have albums or go back later to get things, rather you must upload them again.
- Go to tinypic
- Click "browse"
- Select a photo (you have to do them one at a time)
- Click upload (you don't need to resize it or add tags, it just makes more work)
- you'll have to enter a code in a pop up window to prve you're human, or you may have to watch 5 seconds of a video and then enter the code.
- It'll take you to a page with codes. Link for email/IM, IMG code for forums or boards, HTML for websites, direct for computer codes
- You're done!
There you have it! My top two are definitely Imgur, than tinypic, with photobucket last, but hope it helps!
If you have any to add or have questions or comments, post in the comments below or contact me! :)
If you have any to add or have questions or comments, post in the comments below or contact me! :)
HTML Comment Box is loading comments...
