How To Make Layouts
To make layouts, there are two ways. The first is called a div layout. The second is called a table layout. Here I'm going to teach you to make a div layout, because- well, because it's way easier, takes about 4 hours less, and even I haven't mastered the table layouts yet. ;)
I ALSO HAVE A VIDEO TUTORIAL FOR THIS PROCESS IF YOU'D RATHER WATCH AND LISTEN THAN READ- CLICK HERE!
I ALSO HAVE A VIDEO TUTORIAL FOR THIS PROCESS IF YOU'D RATHER WATCH AND LISTEN THAN READ- CLICK HERE!
Step One: The Image
There are a few ways to get your image- the first is to find one, the second is to make one, the third is to a take a picture yourself. You won't need help in taking your own photo I'm sure, but I can help you with the other options.
Method One: Finding an Image With No Required Attributation
The first thing you need to do is find a picture you want. I do an allowable images search. This is how:
Go to this linked page (opens in new tab/window) and scroll down to the bottom. There you will find an option with a drop down menu:
Go to this linked page (opens in new tab/window) and scroll down to the bottom. There you will find an option with a drop down menu:

Select the last option, "Free to use, share,or modify, even commercially". Then click "Advanced Search" and it will take you to Google Images. Then you can search just like normal, but it will only bring up images you cannot get in trouble for using.
So search for your image. In this example layout I'm making for the tutorial, we're searching for "horse close up".
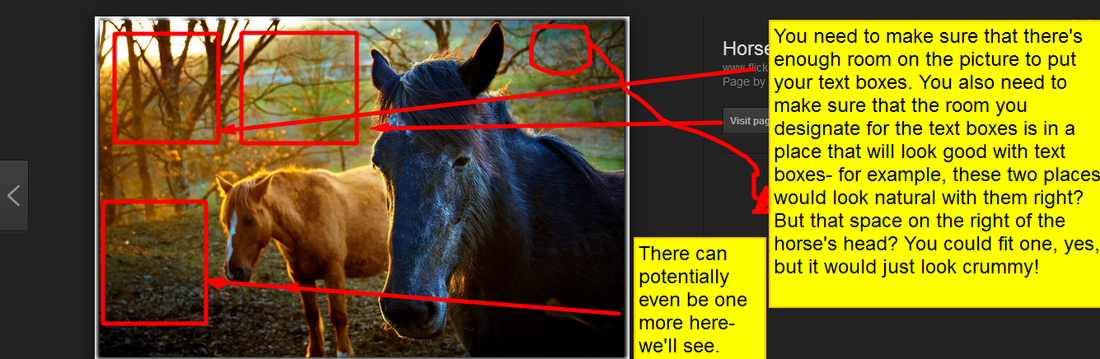
When you find the image you need to make sure it is compatible with the layout you want to make. For instance:
So search for your image. In this example layout I'm making for the tutorial, we're searching for "horse close up".
When you find the image you need to make sure it is compatible with the layout you want to make. For instance:
Method Two: Finding An Image On DeviantART (With Required Attributation)
You could go to DA and search for your keyword, being sure to add the word "stock" [like horse stock or cat stock or meadow stock, etc etc]. When you use this sort of stock you need to out credit to the user, i.e. "image credit [username] @DA" on the image.
Be sure the image is stock and be sure to check the description for rules added by the poster and read their profile page for their stock rules. Be sure to follow them. Some people on there don't want you to use their stuff on Howrse at all, I've run into that, so even if you follow every other rule, it won't matter- just don't use it.
Be sure the image is stock and be sure to check the description for rules added by the poster and read their profile page for their stock rules. Be sure to follow them. Some people on there don't want you to use their stuff on Howrse at all, I've run into that, so even if you follow every other rule, it won't matter- just don't use it.
Method Three: Making Your Image (Doing a Manip)
By now you should have your image! When you find a contender, make sure you save it somewhere where you'll find it easily. Now it's time edit it- these next parts are completely optional, but they make your layout look very professional!
Step Two: Edit The Image
Now it's time to head to an online photo editor! You can also use a normal one like GIMP; just know I can't show you how to do that as I don't use that at this time. Some various online photo editors include Pixlr, Canva, Polarr, Lunapic, and Fotor.
My favorite is ribbet.com. Ribbet is a very awesome photo editor that runs online and is free to use, but some features and most the fonts ARE premium. I have the paid version because of TBH and the other wbesites I run, but the free version works great and the closest thing that is free is fotor.com, which also has iOS and Android apps! Yay!
You can do lots in ribbet- change the eye color of people, clone things, make people in your images look skinnier, make your photos look older, put frames on them, use over 200 fonts on them- the possibilities are endless. Plus it puts no watermark or link on. It's pretty awesome! LOL and no, ribbet did not pay me anything... I just love it that much. Of course you can use any other editor but just know I know nothing about many of them and can't help you there. ;)
Now let's put our text boxes where we want them.
First upload your photo to ribbet, and click the tabs at the top for whatever you want. The effects you can do are by the hundreds, and while some say "premium" next to them, they are actually all free. So do what you want! But keep in mind where you were going to put your text boxes. And then when you're done with the fun stuff, get ready for the exact stuff. First, click the "basics" tab. Click "resize". Your image needs to be 890 x ---- for a wide layout or 503 x --- for a narrow layout. ribbet will make the height look good, as long as you have the aspect ratio button checked. Just type 800 in the first box and click "apply".
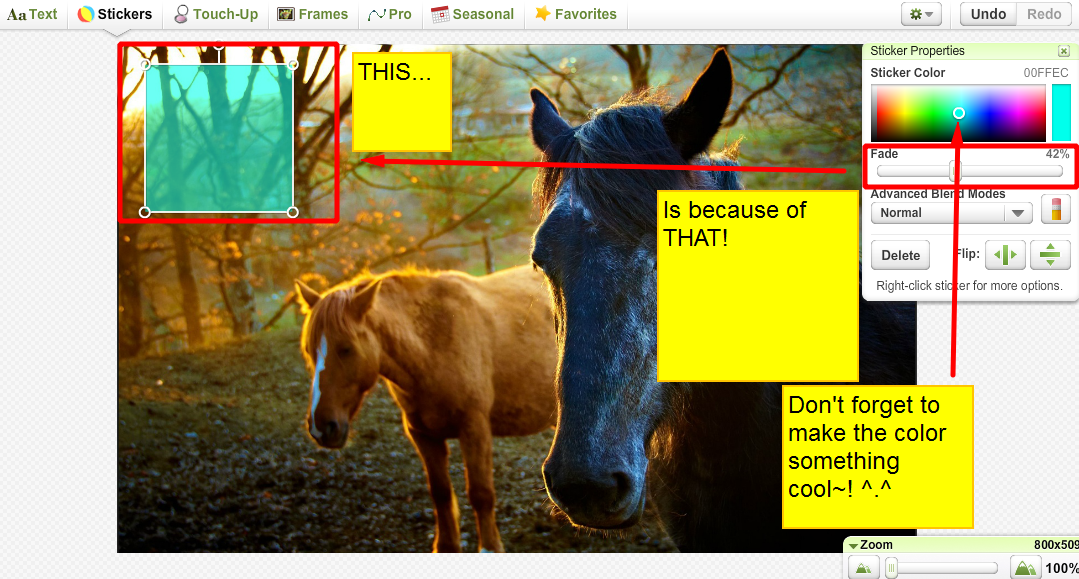
Now click the "stickers" tab. scroll down to the "geometric" option.
My favorite is ribbet.com. Ribbet is a very awesome photo editor that runs online and is free to use, but some features and most the fonts ARE premium. I have the paid version because of TBH and the other wbesites I run, but the free version works great and the closest thing that is free is fotor.com, which also has iOS and Android apps! Yay!
You can do lots in ribbet- change the eye color of people, clone things, make people in your images look skinnier, make your photos look older, put frames on them, use over 200 fonts on them- the possibilities are endless. Plus it puts no watermark or link on. It's pretty awesome! LOL and no, ribbet did not pay me anything... I just love it that much. Of course you can use any other editor but just know I know nothing about many of them and can't help you there. ;)
Now let's put our text boxes where we want them.
First upload your photo to ribbet, and click the tabs at the top for whatever you want. The effects you can do are by the hundreds, and while some say "premium" next to them, they are actually all free. So do what you want! But keep in mind where you were going to put your text boxes. And then when you're done with the fun stuff, get ready for the exact stuff. First, click the "basics" tab. Click "resize". Your image needs to be 890 x ---- for a wide layout or 503 x --- for a narrow layout. ribbet will make the height look good, as long as you have the aspect ratio button checked. Just type 800 in the first box and click "apply".
Now click the "stickers" tab. scroll down to the "geometric" option.
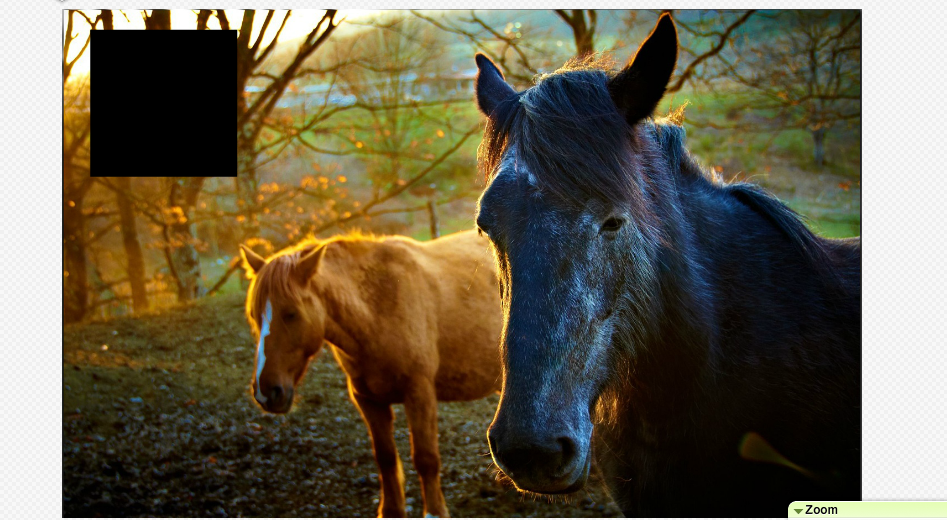
Put a RECTANGLE where you want a text box and resize it so that it's just the way you'll want it for the text box.
Using a square is a bad idea, because it, being a square, must be the same height and width for all four sides. Rectangles on the other hand, can be adjusted to fit into any space.
Using a square is a bad idea, because it, being a square, must be the same height and width for all four sides. Rectangles on the other hand, can be adjusted to fit into any space.
Now get the rest of the text boxes on and then, it's time to title your text boxes!Just click the text tab, and you'll find lots of fonts to do the job.
A cool trick you can do with text if you like is get it all set up the way you want and then right click it and click 'duplicate'. Position the duplicate text to where you can barely see the original stick out and boom! Instant shadow effect. ;) I like to do that with black back text and colored front text, but you can do it anyway you want there.
If you want to add a border around it, you can, but not with ribbet- it's two extra steps but it'll look very cool. In this example I didn't bother, but you can just go ahead and save the image (after everything but the borders are done on it) and then go into your pictures and find it. If you have a Windows computer, you'll find a program called Paint on it somewhere- as far as I know you must have Windows Vista or newer and I'm not positive on Windows 8 right now, but if you view the picture you should see an "open with" option at the top of the bar and if there's not one there, right clicking it and hovering over the "open with" name, and then click "paint" under the menu that pops up. It'll open the image in paint, and then you can select the proper buttons and colors you want and width your want to draw a square with. In paint you can select the square to not have a fill in so you can just draw it around the backgrounds you made with ribbet. When you're done save it as a JPEG and then you can use it like normal. I suggest not titling them till after you do that, and then uploading it to ribbet again to add titles.
When you have that done, you can click "save" at the very top in that upper row of tabs (they're green) and save your image. You should save it as a JPEG for a normal. If you used ANY transparency effects (i.e. selected the "transparent corners" box in the 'rounded corners' effect) then you MUST save it as a .PNG or it won't be transparent.
Now you could head to glitterbase.com or lunapic.com to put some glitter accents/text on the image or put on some animated text, but I think we'll leave this as is, and take it on to the next and most fundamental step- the code!
Step Three: The HTML Code
Most people think layout coding is impossible. Well, table layout codes might as well be, that I will give you, but div codes are actually very easy, as I recently discovered!
You can do this in about 30 minutes. So here we go..... to start you need a place to make the layout. I highly recommend this HTML editor. Just make the text area bigger (click and drag in the bottom right corner). There is also this cool real-time HTML tester, but it has a tenancy to glitch and limits you to three, maybe five boxes before it glitches out. I no longer use it, but some people swear by it.
* I used to send people to Draac.com for the tester, but it has stopped working recently, so clicking that first link will take you to a different one now. ;)
Now when you get to the editor, there'll be some example HTML in there. Delete it, you don't need it. Now it's time to put in your first line of code:
<div style="background: url('DIRECT LINK OF YOUR IMAGE HERE'); width: XXXpx; height: XXXpx;">
And in the spaces that are green you need to fill in. For the direct link, you'll need to take a side trip to tinypic.com or something like it (tinypic is the best no-sign-up-required one, and imgur.com is the best one that allows you to login and have albums and stuff) in a new tab/window, upload your image and get the "direct link for layouts" at the bottom of the list of codes. Pate it in between the two quote marks. Then the XXXs. Those are there, because you need to enter the size of you layout image in PIXELS. Remember when you re sized your image to fit your desired page layout width with ribbet? Now you need to enter that, the first number (generally 503 or 890) in the first space (the width: XXXpx;) and the other number that you got for the height in the other one.
Now press enter to go down a line and start on your first text box!
<div style="width: XXXpx; height: XXXpx; overflow: auto; text-align: XXXX; margin-top: XXXpx; margin-left: XXXpx; float: left;">
the XXXs in the width and height sections are width and height of your text boxes in pixels, once again. The best route here is just to to 100 x 100 for now and later when you have the layout code finished at one text box, you can adjust it one by one until it looks right.
The text-align is for how the text in the text box is aligned. It can be center, left, or right. Take your pick! And then, the margins!
The margins are the most important as they tell the computer where to put your text boxes. The margin-top is how far from the top of the image you're using the text box is, and the margin-left is how far from the left side it is- in pixels, of course.
A good place to start is to make both 50 and then as with the text box size, you will change it more later, when you can see how it looks the way it is.
Now, note that this code depends on where you are putting your text box. If you are putting it on the right side, you can change the "margin-left" to "margin-right" and change the "float: left" to "float: right". You can choose to have the "margin-top" become "margin-bottom" as well.
Once you fill that in, press enter, and start the code to customize your text further:
<font color="black" size="2" face="arial">
Replace "black" with any color you want- red, blue, green, orange, white, etc. If you aren't happy with just the generic colors like that, you could go here, to Howrse Info's internet safe colors, and pick one and put the code in instead- like #FFFF for example.
The size is the size of the text. It is usually 2. It can be 1 or 3 or 4 or 5 or whatever, but normally between 1-3, as any bigger is plain huge. Making it 1 can sometimes make the text show up distorted in some browsers, depending on the font you use, so I never make it smaller than 2, myself.
The "face" part is the font of your text. Check the (giant) image below to see examples of the internet safe fonts you can use! You may only use these fonts, as they come pre-installed on ever computer, tablet, phone, etc. If someone doesn't have the font you chose, the layout will not show up, so this is important!
Note: for some reason, "Book Antiquia" is missing, but you can use that one two- it looks like old typewriter letters.

Now you can put in your random text, on a new line, and make sure to use a ton to make sure your box is going to scroll right. Like this:
* Be careful copying + pasting this bit of 'text' below if you use Google Chrome. For some reason it always freezes your computer up..... I should know.
text text text text text text text text text text text text text text text text text text text text text text text text text text text text text text text text text text text text text text text text text text text text text text text text text text text text text text text text text text text text text text text text text text text text text text text text text text text text text text text text text text text text text text text text text text text text text text text text text text text text text text text text text text text text
And then you can end the code- like this:
</font></div>
And now go down another line and put:
</div>
And then it's time to press the submit button and see where your text box is. It won't be perfect yet, and you'll have to do a lot of changing and re submitting before it will look right. When you have text boxes under more text boxes you may need to use minus numbers, like -50 instead of 50. But when you finally get it right it should be a little like this:
text text text text text text text text text text text text text text text text text text text text text text text text text text text text text text text text text text text text text text text text text text text text text text text text text text text text text text text text text text text text text text text text text text text text text text text text text text text text text text text text
text text text text text text text text text text text text text text text text text text text text text text text text text text text text text text text text text text text text text text text text text text text text text text text text text text text text text text text text text text text text text text text text text text text text text text text text text text text text text text text text
text text text text text text text text text text text text text text text text text text text text text text text text text text text text text text text text text text text text text text text text text text text text text text text text text text text text text text text text text text text text text text text text text text text text text text text text text text text text text text text text
How did I get the other two text boxes you ask? Like this:
And soon you'll be done! Ready to put your layout into your Howrse Page and start filling in your text boxes! (Learn to do that here)
And there's more things you can do too- for instance, in the text box code you can add background color="red" or whatever color and have a background on the text box- you just can't fade it out like we did on the photo editing. :)
- Copy & paste the code of the last text box you did- that means from the first <div> to the </div> that comes after the </font>- and put it on a new line directly below your last text box
- Make sure to change some things based on estimates, otherwise when you click the test button, you'll still see only one box as the two will be directly on top of one another!
- Treat it like the first box you did- make and adjustments little by little by little. The longer you make layouts, the better you'll get at guessing accurately the first couple tries.
- When you have a box under another box, you may need to use a minus [negative] number. Example? If you take a margin, any margin, all the way down to 0 and it hasn't moved the box where you like, try a number like -90. Just remember that with minus numbers, the higher the number, the smaller the distance it will move, and the lower the number, the larger the distance it will move- the opposite of positive numbers.
- IMPORTANT: Make sure you leave that last, lone </div> that's on its own line just where it's at. You can NEVER have any code below that line. Ever.
And soon you'll be done! Ready to put your layout into your Howrse Page and start filling in your text boxes! (Learn to do that here)
And there's more things you can do too- for instance, in the text box code you can add background color="red" or whatever color and have a background on the text box- you just can't fade it out like we did on the photo editing. :)
And you're done!
If you have any questions or want me to look at your code and see if I can find where you made your mistake, I will be happy to help you! Just check the contact me page!
Troubleshooting:
Based on the PMs, comments and emails I get, I've put together a small troubleshooting FAQ of sorts- things to check before contacting me. :)
If that didn't help, email me, or PM me, and I'll see what I can do! :)
- Have you messed up your margins and accidentally put your text box way above or below the layout itself? This can make sit seem the box itsn't showing up, when really it is, especially if you use white text.
- Use a font from the approved fonts list and make sure to spell it right!
- Use a color that can be written (no 'sky blue pink' lol) and if you use a hex code, make sure you got it right!
- Check each and ever letter- painstakingly- for a comma or semi-colon out of place. That happens a LOT.
- Don't try to edit text in text boxes in HTML mode.
- Never try and use "<br>" or any other HTML tag in HTML mode either.
- Make sure you got the image margins right.
- You CANNOT use "margin-right" or "margin-bottom". ONLY margin-top and margin-left. I used to have the wrong info on that here, sorry!
- Make sure you have all your ending tags- every tag like <font> needs a closing tag somewhere, like </font>
- Always try it again in another HTML editor. Sometimes it mysteriously likes one better.
- Don't code in Howrse itself- it works great for some people, but I would recommend a beginner code-est to use an editor. :p
If that didn't help, email me, or PM me, and I'll see what I can do! :)
I would like to give a shout out to Overo in the International Howrse server for posting this layout tutorial and being so patent with my endless, and inevitably annoying, questions via PM. XD. Please click the link above, to stop by and congratulate her!
HTML Comment Box is loading comments...
